E20 | Hang Shades, Steep Landscaping | Ask This Old House
Season 24 Episode 20 | 23m 42sVideo has Closed Captions
Nathan installs top-down bottom-up shades. Jenn landscapes a steep front yard.
Nathan Gilbert installs top-down, bottom-up shades to block the outside view for a tiny guard dog while still allowing sunlight into the house. Richard Trethewey explains toilet tank anatomy, common failures, and how to fix a running toilet. Jenn Nawada tackles a steep front yard, reshaping the slope and adding erosion-control plants to create a safer, more attractive landscape.
Problems playing video? | Closed Captioning Feedback
Problems playing video? | Closed Captioning Feedback
Funding for Ask This Old House is provided by The Home Depot, Renewal By Andersen, and ChipDrop.
Support provided by:


E20 | Hang Shades, Steep Landscaping | Ask This Old House
Season 24 Episode 20 | 23m 42sVideo has Closed Captions
Nathan Gilbert installs top-down, bottom-up shades to block the outside view for a tiny guard dog while still allowing sunlight into the house. Richard Trethewey explains toilet tank anatomy, common failures, and how to fix a running toilet. Jenn Nawada tackles a steep front yard, reshaping the slope and adding erosion-control plants to create a safer, more attractive landscape.
Problems playing video? | Closed Captioning Feedback
How to Watch Ask This Old House
Ask This Old House is available to stream on pbs.org and the free PBS App, available on iPhone, Apple TV, Android TV, Android smartphones, Amazon Fire TV, Amazon Fire Tablet, Roku, Samsung Smart TV, and Vizio.
Keep Exploring


This Old House Insider Newsletter
Get This Old House exclusive stories, tips, and behind-the-scenes information delivered right to your inbox every month.Providing Support for PBS.org
Learn Moreabout PBS online sponsorship♪ Kevin: On "Ask This Old House," our experts travel across the country to answer questions about your house.
♪ Today, Nathan helps a homeowner measure for new shades and assists in the install.
Lianne: That's really nice!
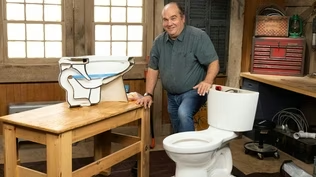
Kevin: Then Richard gives a quick anatomy lesson on toilet tanks.
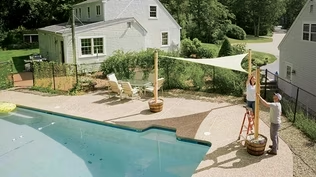
And how do you add curb appeal to a steep front yard?
Jenn jumps in with a design plan.
Jenn: This is called panicum virgatum.
They're going to help stabilize the slope.
Shannon: I love it.
Kevin: All that on "Ask This Old House."
♪ [ Dog barking ] Lianne: Hi!
Nathan: Hi, Lianne.
Nice to meet you.
Lianne: Nice to meet you, too.
Nathan: How are you doing?
Lianne: I'm doing well.
Nathan: Who is this?
Lianne: Oh, this is Cece.
Nathan: She's already already introducing herself.
Lianne: Oh, she is.
She introduces herself to you and everybody else outside.
Nathan: She's a cutie.
Lianne: Oh, she is.
Nathan: So you wrote me about shades, right?
Lianne: I did.
We have these shades.
Nathan: Mm-hmm.
Lianne: They're temporary.
They don't suit our needs because we have this little one who really likes to bark all the time at people walking by.
Nathan: I bet.
You want to block Cece's view out, so... Lianne: We do, and we also want to let some light in.
Nathan: So she's barking, but these only come from the top down.
So a nice alternative, we can go with some cellular shades that are top down, bottom up.
That way, we can bring them down to about the midpoint and then drop them the rest of the way.
Kind of blocks her view from the street but also lets that natural daylight come in.
Lianne: That would be great.
Thanks.
Nathan: I'm gonna go grab a tape measure so we can make a list of the shades that we need.
Lianne: Sounds great.
[ Dog barking ] Nathan: Alright.
Do you want to take some notes for me?
Lianne: Absolutely.
Nathan: Alright.
Here's a pencil.
So we're gonna get started by taking this old one down.
Lianne: That's gonna be nice to have removed.
Nathan: [ Chuckles ] Yeah.
When it comes to shades, there's a lot of options, but we're kind of narrowing it down to cellular shades.
So when you go to that, there's really two options -- inside mount and outside mount.
So, inside would be between the casing here and here.
And outside would cover across.
Um, to do the inside mount, we need to have a minimum of 3/4 of an inch of depth.
So you got an inch and 1/8 and inch and 1/8.
So we're good.
We can do the inside mount.
Lianne: Okay.
Nathan: Um, next we want to measure the width, so to do that, I'm gonna measure in three spots.
Gonna measure at the bottom, in the middle, and at the top, and then I'm gonna go with the smallest measurement.
Lianne: Okay.
Nathan: So I got 33 and 1/8".
33 and 1/4" and...33 and 1/4".
So we'll go 33 and 1/8" at the bottom.
Lianne: Okay.
Alright.
Nathan: That'll be our measurement we're gonna drive off of.
And then for the height, again measure in three spots.
51 and 1/2."
51 and 1/2."
And...51 and 1/2."
So it's all the same.
So we'll send that measurement out.
And we're gonna send these to the factory, and they'll do their reducing that they need to on the width to ensure it fits.
They'll probably reduce it about 1/8 inch so you have a little room on either side to snap it in.
You have a lot of windows, so we're gonna go around, we're gonna measure them all, we're gonna place the order, we're gonna go pick them up, and then we'll put them in.
So that's window one.
Let's go to window two.
Lianne: Sounds good.
Nathan: Alright.
♪ Alright.
So we have everything we need.
We got our shade, our mounting brackets, screws to put them up, and our handle.
So we're gonna get started with the layout up top.
And they say that you should come in anywhere from 2 to 4 inches, so I'm gonna come in 3 inches.
And from the left side come in 3 inches.
And then we're simply gonna put our mounting bracket up into place.
And you can see we have a good spot right here for one screw in the center.
If this was deeper and we had more room, we could put two screws in, but all it requires is just one.
And then I'm gonna go over here and bring that over to my 3-inch mark and go right in the center.
And now we know where we need to pre-drill.
So 1/8-inch drill bit.
It's about the size of the shank of the screw.
So, that way, just the threads are grabbing on the screw.
You want to do that hole?
Lianne: Sure.
Nathan: Alright.
Alright, so you can pre-drill that mark right there, right in the center.
Lianne: Yeah.
Nathan: Perfect.
And you can spin it.
Spin it out.
Nice.
So now all we need to do is take our drill bit out.
Lianne: Yep.
Nathan: And what's nice is 1/4".
The head of the screw is 1/4".
So we can just put that right there.
Alright.
We'll put our mounting bracket back into place here.
Lianne: Yeah.
Nathan: We'll bring the screw up in.
Alright.
Lianne: Okay.
Nathan: And you want to do the left side?
Lianne: Yeah.
Nathan: Alright.
So I'll give you a hand.
This is a little bit sloppy, so just put one hand on the screw so it doesn't fall out.
Lianne: Okay.
Nathan: And then this is how the bracket gets mounted right there.
And then there's gonna be a little resistance, so you do want to push hard.
Yeah.
Okay.
Lianne: Yeah.
Nathan: Alright.
Go right.
Put a lot of weight behind it.
And then hard right.
Spin the gun.
There you go.
Perfect.
Lianne: Okay.
Nathan: Alright.
That's all we need to do for those.
Alright.
So now we're ready for our shade.
So there is a front and a back to this.
So you see that groove right there?
Lianne: Yeah.
Nathan: So that's our front.
And that is gonna hook right onto these mounting brackets right there.
So I'm gonna bring it up into place.
I'm gonna hook it on, hook it on, and then I'm gonna use my fingers and I'm gonna go equal, equal.
And then all I'm gonna do is roll down.
Alright.
So one more thing.
We need to add that handle.
Lianne: Yeah.
Nathan: Snap that on.
Alright.
Let's give it a try.
Lianne: Okay.
Nathan: Nice.
We pull that down.
Lianne: Oh, that's nice.
Nathan: Block Cece's view.
Lianne: That's really nice.
Nathan: But then if you want to let that light in, bring this down.
I always like to do it with two hands and then line it up with the top of that window sash.
Lianne: That's what we've been missing.
Nathan: Yeah.
Alright.
Let's go do the rest of the windows.
Lianne: Sounds good.
Let's go.
♪ ♪ ♪ Nathan: Alright.
You're all set.
Lianne: I am so happy.
Nathan: You like 'em?
Lianne: What a difference.
Yes.
Nathan: Good.
Good.
Yeah, a big change.
But tell Cece I said sorry about that.
Lianne: I don't know how she's gonna feel about that.
Nathan: Oh, no.
Maybe an hour a day?
Lianne: That sounds good.
Nathan: Leave 'em open?
Lianne: Yeah.
Nathan: Well, take care.
Lianne: Okay.
Thank you so much, Nathan.
Nathan: You're welcome.
Lianne: Take care.
♪ Kevin: Oh, I'm sorry, sir.
I didn't realize you were in the bathroom.
Richard: Welcome to my lavatory.
Kevin: Oh, it's a lavatory.
Richard: Kevin, this is a high-tank toilet from about 1880, maybe 1890.
Kevin: Like a real one?
Richard: Absolutely.
A real one.
Okay?
It was a high tank.
It sat up on the wall.
It had a tank that was wood with copper inside.
And it had a bowl down here.
And it relied on the weight of water.
The water came smokin' down inside here.
It had four things inside the tank.
One was a tank lever to flush it.
One was a flush valve to allow that water to leave the tank and come down.
The other was a fill valve to put water back in.
And look at this.
This is the original tank ball.
This is made out of copper.
Kevin: This is a float, right?
Richard: That's right.
Kevin: So as it goes up, it... Richard: That's right.
It'll shut the water off.
And then it had an overflow, but it wasn't overflow you really wanted.
The overflow was-- If it didn't stop the flow, the water came out through the floor, so these were often in the basement.
Kevin: Very apparent.
Richard: So these four pieces are in any modern toilet nowadays.
So here's what a modern toilet tank looks like.
You got a tank lever that actuates in this case a flapper.
It also has a fill valve, a little different than the old ones.
This comes up and shuts the water off.
It has an overflow right here integral to the tank.
Kevin: Right.
Richard: But we didn't get there easily.
Let me take you through some.
In my past, in this industry, this is what we always saw inside of a toilet.
Early flush valve would have been all bronze and brass.
It would have had these stem wires and lift wires.
It would have had an overflow tube.
And the tank lever.
They were all sort of proprietary.
So now that tank lever would then try to lift the tank ball.
It wasn't a flapper back then.
And now you try to adjust these wires and the-- and make it just be right.
So then you hope that the ball would drop correctly, but it never really did, and so it was really a never-ending challenge to try and make this thing drop perfectly.
Kevin: So, just so I'm clear, when you have this up, right, the flushing process, that's all the water rushing out of the tank through this into the bowl?
Richard: Now, with nothing to hold it, that ball would drop, and you hope it would make a nice, tight seal.
And then the evolution was this.
This is the modern flush valve.
So you can see that there were two shanks on the side of the overflow.
And this is called a flapper.
And the flapper with the chain would attach to the tank lever, and the tank lever would lift the flapper.
And you really wanted that flapper to stay open long enough to completely evacuate the tank.
You don't want it to do it too quickly.
So these were adjustable.
And then these two shanks made it so that the flapper really dropped precisely onto that flush valve.
And that worked way better.
Kevin: So you had a really good seal.
Richard: That's right.
Kevin: So the flushing part got better.
Richard: It got better.
Absolutely.
But also the filling got better.
So this is what a version of this would have been, what that had, and it would have had now a plastic ball.
And it had this rod that would be-- that you'd have to adjust.
You'd have to adjust this to the right level in relation to the overflow.
Kevin: And bending it was the adjustment, right?
Which, in my house, only Dad was allowed to touch this.
Richard: He was the only one qualified.
Well, then the big breakthrough was this.
This is the modern fill valve.
And so instead of having the ball... The ball was an integral part of the shank.
And so now as the water came in, it would come up and then it would shut that off.
And it had an adjustability feature right here, as well.
And this is the refill tube right there.
Kevin: So this is what we look like all put together?
Richard: Absolutely.
So here it is all here.
The tank lever.
You never know if it's gonna be on this side, on the front, or on the opposing side.
Nowadays they've got universal tank levers that do it.
You've got your flush valve, and that goes up.
You can always adjust those as necessary.
You got your fill valve right here.
And you've got a refill tube right here.
That comes into the top of the overflow.
Now, I want to take you over here to where this flush valve comes into here.
So right here is where the flush valve enters.
And when you flush that, that water comes down into this flush rim all the way here.
And there's little tiny holes underneath here that'll scour the sides of the bowl.
But that same water comes out through a siphon jet at the bottom to create that siphon action to flush the bowl.
But then that refill tube, that other tube, will actually send a little bit of water after the fact, so it replaces that water to the right level in the bowl, hence the name "refill tube."
Kevin: So when we're filling, we're not just filling the tank on the back, but we're putting a little bit of water to fill the bowl.
Richard: Absolutely.
Kevin: Roger that.
Richard: So 150 years ago, we had 4 or 5 gallons here.
Then we had a mandate to get to 3.5 gallons.
Now we're down to 1.6 gallons.
So we need it to really work every single time.
So now you see all the components right here.
[ Toilet flushes ] Flush valve.
Water leaves.
Swirls right around to keep that bowl nice and clean.
Fill valve.
It replenishes.
Here's that overflow.
Here's the refill.
And there's really only two adjustments we count on people to do.
One is to adjust the tank lever and the linkage so that this-- the right amount of travel on the flapper.
And the other is to adjust this float, and that's pretty straightforward.
You can see there's a Phillips screwdriver slot right here, and we can go counterclockwise to make the water level be lower.
And you want that water level to be just about 3/4 of an inch down from the top of the overflow, just about like right there.
Kevin: Hm.
Richard: Okay?
And that's the way it should be.
And you should be able to flush this every time, one flush, and save water and be nice and clean.
I think I could work in your museum.
Richard: You could.
Kevin: Yeah.
Richard: You could be a provost.
Kevin: A toilet docent.
Richard: [ Laughs ] ♪ Jenn: Hey, Shannon.
Shannon: Hi, Jenn.
It's great to meet you.
Jenn: Great to meet you in person.
So this is the area, right, that we discussed.
Shannon: Yes, so my husband and I recently moved in and we're having trouble with the sloped front yard.
We're not sure what to do with it.
It's hard to maintain.
We can't really take a lawn mower to it.
So we've just been using a weed whacker to get at the little bit of grass that's there.
So, yeah, we're not sure what to do.
Jenn: Well, do you know what was here before?
Shannon: So, we saw an old photo where it looked like the previous owners had built a garden bed with some mulch and a few bushes, but it wasn't here when we moved in.
I'm not sure why they got rid of it.
Jenn: Right.
Well, it is very difficult to maintain a slope that's this steep.
There's a lot of erosion happening.
I mean, you can see where they tried to throw grass seed down, but with it at such a steep angle, it just looks like it washed out.
And it looks like it's a nightmare to try to maintain.
Shannon: Yes.
Jenn: So what I would like to do is soften the slope.
So this whole area, I'd like to regrade and just cut some of the harshness of how steep it is.
And then we come through after that's all set and then plant with plants that are going to help stabilize the slope and then add a little curb appeal, too.
I mean, there's a lot of traffic going by.
It'd be nice to have some kind of barrier between you and the road.
Shannon: Definitely.
That sounds perfect.
Jenn: Awesome.
So I'm gonna grab my tape measure.
I'll be back, and then we can figure out how many plants we need.
Jenn: Alright.
Great.
Jenn: Alright.
♪ Okay, so I've already called out 811, and that's gonna notify about all utilities in the area.
And it's a good thing because there is a gas line right here.
And my guy Frank is gonna come in with a mini excavator, but we're gonna hand-dig around the gas area.
Shannon: Perfect.
Jenn: Okay?
So let's measure up the slope.
Between 10 and 12 feet.
You make a mark there.
And then let's go this way.
Alright.
Maybe one more.
This will just be a reference line.
Alright.
So when he comes in, I'm gonna have him start working from the top down and then softening this.
Shannon: Sounds good.
Jenn: Alright.
♪ Shannon, I want to introduce you to Frank.
Shannon: Hi, Frank.
Frank: Hi.
Jenn: He is my excavator and will be working the front slope for us today.
So let's talk about what you and I discussed.
Frank: Sure.
So we brought our mini excavator in today with a clean-out bucket, a smooth-edge bucket, which will enable us to reshape a bit and soften it so we can do additional planting.
Shannon: Okay.
Jenn: And then we're gonna work from the driveway over to this way and work our way out.
So why don't you get started up here, and then we'll take these flat-head shovels along the sidewalk and clear it and refine the sidewalk edge?
Shannon: Perfect.
Jenn: Okay.
♪ Jenn: Nice.
Nice.
♪ ♪ Okay, Frank, I really like how this is looking.
Perfect.
Maybe just shave a little bit more off of this area.
Frank: Yeah.
Jenn: And then we'll follow this line.
Frank: Okay.
Jenn: And then I'm thinking, start right there, and then we'll just... ♪ ...end the work here.
Frank: Okay.
Jenn: And then this could all just fade into how it is.
Frank: Sure.
♪ ♪ Jenn: Frank, I really like how you carved into the slope.
He really took off that hump, the lump at the end and created this shelf, essentially.
Frank: We did.
Glad we could help out.
With a little bit of diversion there with the swale, it should spread some of the water from just heading for the sidewalk, and it'll benefit the plants.
Jenn: And that's what we were looking for.
Slowing down the water flow.
So, next up, we're going to look at plants that are going to help with that, as well.
And your duties are done here, sir.
Frank: Thank you.
Shannon: Thank you.
Jenn: Thanks for coming to help.
Frank: Good luck.
Enjoy it.
♪ Shannon: So, Jenn, tell me about my new plants.
Jenn: Okay.
This whole middle section, this is called panicum virgatum.
It's a switchgrass.
They're going to help stabilize this slope.
So, what the root system is going to do underneath, it's very extensive.
They're all gonna knit together.
And on top, they're all gonna come together eventually as one mass, so erosion control at its finest.
Shannon: Perfect.
Jenn: They're gonna get about 4 feet tall, and then they're gonna sway in the wind and they're gonna have texture and height.
Shannon: Nice.
Jenn: It's gonna be beautiful.
Here we have this little limelight hydrangea.
I have three on this side and three at the other end.
And they are gonna get about 4 feet wide by 4 feet tall.
So they're gonna be comparable to the grasses to kind of do their thing together.
They bloom about July time all the way to the end of the season.
So constant, constant blooms.
And so this is the start of the shelf area that Frank sculpted out for us.
And the purpose, again, to slow the water down.
And we have three endless summer hydrangeas.
They're the blue ones.
You can see the remnants of that.
I think your husband likes that one.
Shannon: He does.
Jenn: So we have those three.
And they're gonna also get like 4-by-4 or 5-by-5.
Up at the top, we have a Japanese threadleaf maple.
That's gonna get about 8 to 12 feet around.
And at the end, we have three limelight hydrangeas.
Not the little limelights... but the limelights.
And they're gonna get 8 to 10 feet tall.
It's gonna block that busy road for you and just to give you a little bit of privacy and screen.
Shannon: Perfect.
Jenn: What do you think about the layout?
Shannon: I love it.
It's perfect.
Jenn: What do you think about digging holes?
Shannon: Let's do it.
Jenn: Alright.
Come on.
Alright.
I'm gonna show you how I want them planted.
So basically go to the plant, take it out.
And the reason I've dug these small holes first is because they're rolling down the hill.
So just make sure it's nice and wide.
Right?
Then I'm gonna go over here to the compost, grab a nice shovel full.
Chuck it in the hole.
Grab a handful of starter fertilizer.
Throw it in.
And then incorporate it with the existing soil.
And then you could just bang the sides like this, pull the plant out, and then loosen up the roots so they're not growing in a circular fashion.
You see how they get all clumped up right there?
Shannon: Mm-hmm.
Jenn: And then... just tease it a little bit and then go back to the hole.
They could be a little bit high because we're gonna mulch it a little bit.
And then just backfill.
What do you think?
Shannon: Perfect.
Sounds great.
Jenn: Yeah.
And you can just tuck in around the edges so it's a little stable and in place.
Shannon: Sounds good.
Jenn: Okay.
♪ I'm gonna give you a couple because it's really dry-looking.
♪ Look how long these roots are.
So they're gonna help you from washing out into the street.
Shannon: Definitely.
♪ Jenn: So the bigger plants, the same thing, Shannon.
You just see how they're just so root-bound?
Shannon: Yeah.
Jenn: Just break them up, and it'll encourage the growth to go out.
Otherwise, they'll keep growing in a circle.
Shannon: Mm-hmm.
♪ Jenn: That one actually looks a little low.
Pull it up like that and then tuck.
Shannon: Fill it in?
Jenn: Yeah.
Shannon: Okay.
Jenn: Plants would rather be higher than lower.
Shannon: Okay.
Jenn: I also wanted to have the plants a little bit further back from the driveway for your sight line of pulling in and out.
♪ So we're gonna plant the Japanese maple next.
First, I want you to pick a face.
So I'm gonna spin it.
Shannon: That looks good right there.
Jenn: One, two, three.
It kind of does go with the angle of the slope.
Shannon: Perfect.
Jenn: Alright.
Nice job picking the face.
Shannon: Nice!
Jenn: I already threw compost in the hole, so we can start backfilling it.
It's mulch time.
Um, this is leaf mulch.
Shannon: Okay.
Jenn: And it breaks down.
It's gonna add a lot of nutrients to your soil.
Gonna apply about 2 to 3 inches.
Shannon: Okay.
Jenn: And if it gets too much around the base of the plants, we'll just move it away with our hands at the end.
Shannon: Perfect.
Jenn: Alright.
So I think we have accomplished what you called in for, right?
Shannon: Yeah, definitely.
Jenn: You have a beautiful hillside now, but it's also functional.
It has erosion control that Frank made the nice step in it.
It's gonna slow the water and the runoff down.
And then these plants are really gonna lock it in.
We've added a curb appeal, and it looks beautiful.
Shannon: How do I take care of them?
Jenn: That's a very good point 'cause you have to keep it looking beautiful.
The maintenance, it's gonna be easy because the grasses and the limelight hydrangeas, they both require pruning at the same time -- in February, March.
Whenever it's like -- Before the new growth starts to emerge.
The limelight hydrangeas, they bloom off of new wood.
So that's the best time to cut them back and shape them.
And then the grasses, you want to cut to 2 to 3 inches high before the new growth emerges so you don't chop off the tops.
Shannon: Perfect.
Jenn: Okay?
One more thing.
The endless summer hydrangeas.
They bloom on new and old wood, so prune them at the end of the season.
Just deadhead them when they're done flowering.
And then let the Japanese maple go.
Shannon: Perfect.
Jenn: Watering.
Just water throughout the end of the season.
You're gonna want to add some drip irrigation on the shrubs and the tree.
Grasses, you could probably hit with sprays.
Address that next year.
Shannon: Okay.
Jenn: And then maybe top dress with an inch of the leaf mulch, and you'll be all set.
Shannon: Awesome.
Thank you again.
Jenn: Yeah.
Nice to meet you.
Shannon: Nice to meet you.
Jenn: Alright.
Take care.
♪ Kevin: Next time on "Ask This Old House"... Heath helps a homeowner run power to their new shed... Man: That's incredible.
Kevin: ...then Mauro shares some of his favorite painting accessories... Mario: Do your cutting.
Kevin: A little magnetic.
Beautiful.
...and Jenn and Richard play a fun game of... Disposal or Compost?
And it is... Richard: Chicken.
Kevin: All that on "Ask this Old House."


Support for PBS provided by:
Funding for Ask This Old House is provided by The Home Depot, Renewal By Andersen, and ChipDrop.